Slide 1 of 12
Slide 1 - Refrigerator Condenser Coil Cleaning Process & Best Practices
Refrigerator Condenser Coil Cleaning Process & Best Practices
Preventive Maintenance SOP
Generated from prompt:
Create a professional Standard Operating Procedure (SOP) presentation titled "Refrigerator Condenser Coil Cleaning Process & Best Practices". Include images/visual illustrations on relevant slides. Slide 1: Title Slide - Refrigerator Condenser Coil Cleaning Process & Best Practices - Subtitle: Preventive Maintenance SOP - Include image of refrigerator condenser coils (rear or bottom view) Slide 2: Purpose - Explain importance of cleaning condenser coils - Energy efficiency - Prevent overheating - Extend equipment lifespan - Food safety protection Slide 3: Scope - Applies to residential and commercial refrigerators - Maintenance personnel and facility teams Slide 4: Required Tools & PPE - Coil cleaning brush - Vacuum with brush attachment - Soft cloth - Fin comb (optional) - Screwdriver (if panel removal required) - PPE: gloves, safety glasses, dust mask - Include tool images Slide 5: Safety Precautions - Disconnect power before servicing - Avoid damaging refrigerant lines - Do not use water near electrical components - Allow compressor to cool - Proper ventilation - Include safety icons Slide 6: Step-by-Step Cleaning Procedure (Part 1) 1. Unplug refrigerator 2. Locate condenser coils (rear or bottom) 3. Remove access panel if required 4. Inspect for debris buildup - Include diagram image Slide 7: Step-by-Step Cleaning Procedure (Part 2) 5. Use brush to loosen dust 6. Vacuum debris carefully 7. Straighten bent fins if needed 8. Wipe surrounding area - Include visual illustration Slide 8: Post-Cleaning Checklist - Ensure no tools left behind - Reinstall panel securely - Restore power - Verify normal operation - Check for unusual noise Slide 9: Best Practices - Clean every 3–6 months - More frequent cleaning in dusty environments - Keep surrounding area clear - Document maintenance Slide 10: Risks of Improper Cleaning - Damaged fins - Compressor overheating - Increased energy use - Equipment failure Slide 11: Documentation Template - Date - Technician name - Condition observed - Corrective actions - Next scheduled cleaning Slide 12: Conclusion - Summary of benefits - Preventive maintenance importance - Contact maintenance supervisor if issues found Use clean professional layout with maintenance-themed visuals and relevant images on multiple slides.
Comprehensive SOP for cleaning refrigerator condenser coils. Covers purpose, scope, tools/PPE, safety, step-by-step procedure, checklist, best practices, risks, and documentation. Improves efficiency, prevents failures, ensures food safety for maint.
Refrigerator Condenser Coil Cleaning Process & Best Practices
Preventive Maintenance SOP

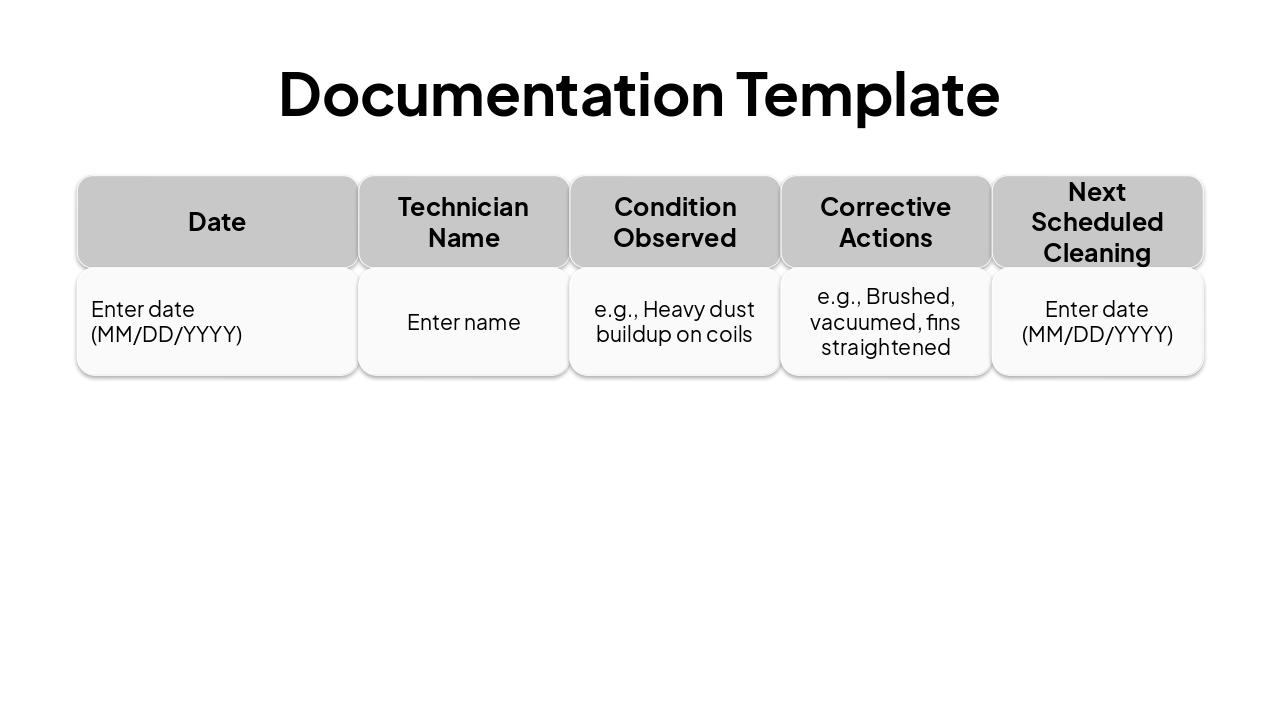
| Date | Technician Name | Condition Observed | Corrective Actions | Next Scheduled Cleaning |
|---|---|---|---|---|
| Enter date (MM/DD/YYYY) | Enter name | e.g., Heavy dust buildup on coils | e.g., Brushed, vacuumed, fins straightened | Enter date (MM/DD/YYYY) |
Regular condenser coil cleaning ensures energy efficiency, prevents overheating and failures, extends equipment lifespan, and protects food safety. Emphasize preventive maintenance.
Contact maintenance supervisor if issues found.

Explore thousands of AI-generated presentations for inspiration
Generate professional presentations in seconds with Karaf's AI. Customize this presentation or start from scratch.