Slide 1 of 19
Slide 1 - First Aid Training
Basic to Advanced First Aid & CPR Training for Maritime Industry – Khalid Faraj Shipping
Comprehensive First Aid & CPR Training for Maritime Professionals
---
Photo by Ian Taylor on Unsplash
Generated from prompt:
Create a COMPLETE beginner-to-advanced professional presentation titled 'Basic to Advanced First Aid & CPR Training for Maritime Industry – Khalid Faraj Shipping'. Start from absolute basics. Use uploaded logo (/mnt/data/KFS _ JJJ.jpg) on title and footer. Use clean maritime theme (blue, red, white) with visual-friendly slides. Include 24–26 slides structured as: SECTION 1 – FUNDAMENTALS (VERY BASIC) 1. Title Slide 2. What is First Aid (definition + purpose) 3. Aims of First Aid (3 Ps: Preserve Life, Prevent Deterioration, Promote Recovery) 4. Role of a First Aider (maritime context) 5. First Aid Priorities at Sea 6. Safety & Scene Assessment SECTION 2 – BASIC FIRST AID 7. DRABC (flow diagram) 8. Checking Responsiveness & Breathing 9. Recovery Position 10. Bleeding Control 11. Burns Treatment 12. Choking Response 13. Shock Management 14. Fractures & Sprains 15. First Aid Kit onboard ships SECTION 3 – CPR & LIFE SAVING 16. CPR Overview 17. Adult CPR Step-by-Step 18. CPR on Moving Vessel 19. Child & Infant CPR 20. AED Use 21. Drowning & Rescue Breathing 22. Hypothermia SECTION 4 – WORKPLACE TRAINING 23. Emergency Communication (VHF) 24. Crew Drill Scenario 25. Safety Culture 26. Summary & Thank You Each slide: - Simple beginner-friendly language - Clear bullet points - Visual suggestions - Training-ready format Ensure FULL downloadable PPTX and PDF output.
Comprehensive training deck on first aid and CPR for maritime professionals, covering definitions, 3 Ps aims, scene assessment (DRABC), recovery position, bleeding control, burns, choking, shock, fractures, onboard kits, and adult/child/infant CPR,包括
Basic to Advanced First Aid & CPR Training for Maritime Industry – Khalid Faraj Shipping
Comprehensive First Aid & CPR Training for Maritime Professionals
---
Photo by Ian Taylor on Unsplash
---
Photo by Krystian Tambur on Unsplash
---
Photo by Krystian Tambur on Unsplash
---
Photo by Krystian Tambur on Unsplash
---
Photo by Krystian Tambur on Unsplash
---
Photo by Krystian Tambur on Unsplash
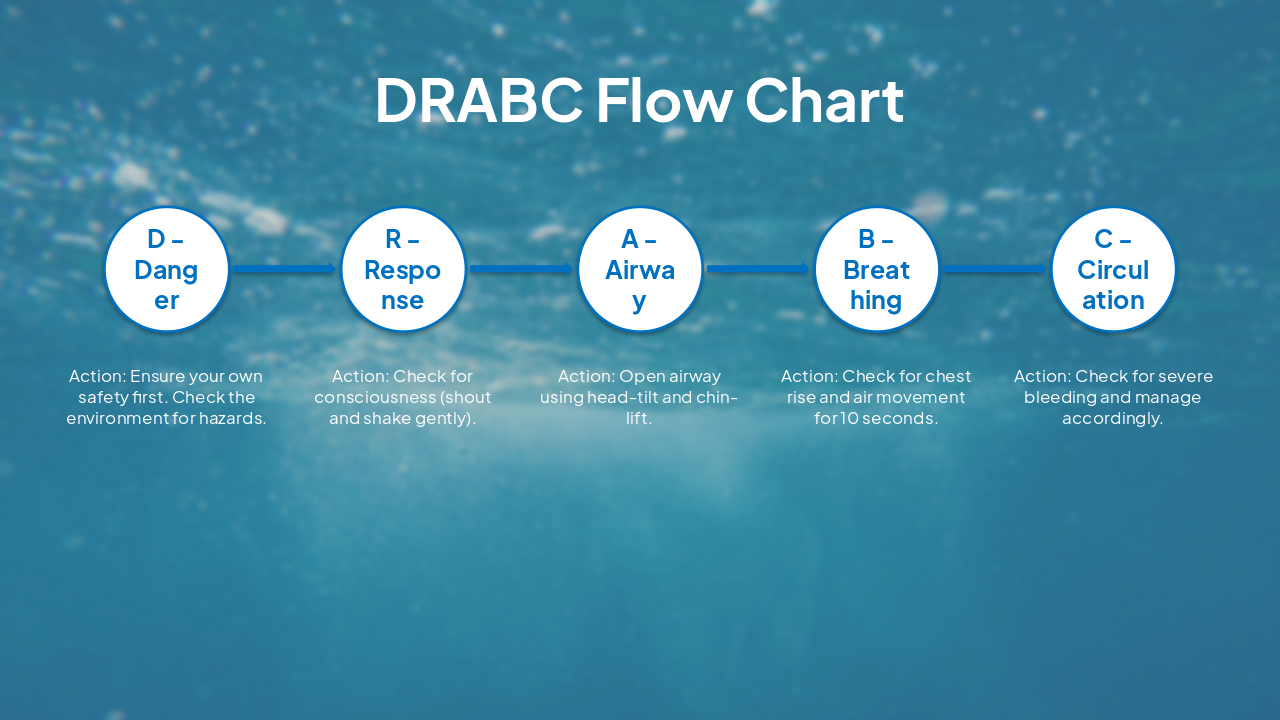
| Step | Action |
|---|---|
| D - Danger | Ensure your own safety first. Check the environment for hazards. |
| R - Response | Check for consciousness (shout and shake gently). |
| A - Airway | Open airway using head-tilt and chin-lift. |
| B - Breathing | Check for chest rise and air movement for 10 seconds. |
| C - Circulation | Check for severe bleeding and manage accordingly. |
---
Photo by Krystian Tambur on Unsplash
---
Photo by Krystian Tambur on Unsplash
---
Photo by Krystian Tambur on Unsplash
---
Photo by Krystian Tambur on Unsplash
---
Photo by Krystian Tambur on Unsplash
---
Photo by Krystian Tambur on Unsplash
---
Photo by Krystian Tambur on Unsplash

---
Photo by Krystian Tambur on Unsplash

---
Photo by Krystian Tambur on Unsplash
---
Photo by Damien Dufour on Unsplash
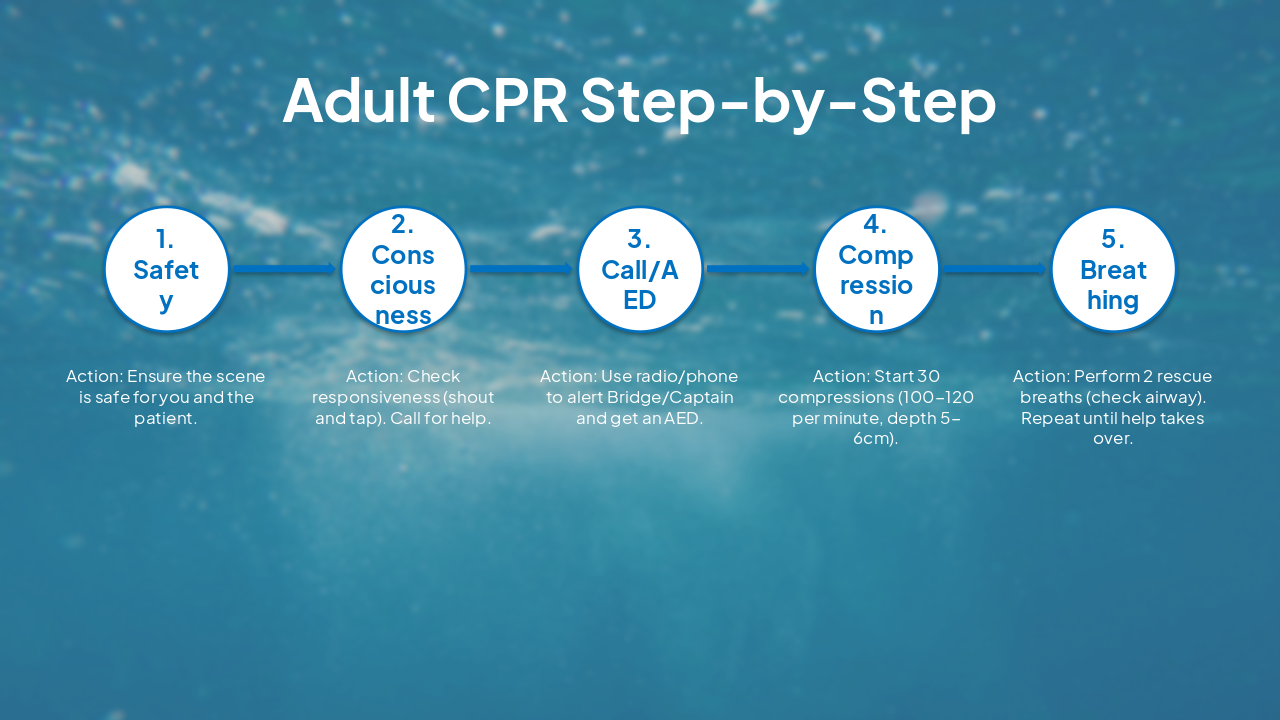
| Step | Action |
|---|---|
| 1. Safety | Ensure the scene is safe for you and the patient. |
| 2. Consciousness | Check responsiveness (shout and tap). Call for help. |
| 3. Call/AED | Use radio/phone to alert Bridge/Captain and get an AED. |
| 4. Compression | Start 30 compressions (100-120 per minute, depth 5-6cm). |
| 5. Breathing | Perform 2 rescue breaths (check airway). Repeat until help takes over. |
---
Photo by Krystian Tambur on Unsplash
---
Photo by Krystian Tambur on Unsplash
---
Photo by Krystian Tambur on Unsplash
Explore thousands of AI-generated presentations for inspiration
Generate professional presentations in seconds with Karaf's AI. Customize this presentation or start from scratch.